This how to shows how to configure an ERP5 Tiolive Instance
Table of Contents
Subscription
In order to use TioLive, you will have to subscribe for free to the service. This procedure is made of the following steps:
- Subscribe to the service (learn How to subscribe to TioLive)
- Confirm your ID (learn How to confirm your identity)
- Configure TioLive
Configure TioLive
As soon as we receive the ID confirmation, we will set up an account for you. You will then receive two emails:
- One is to welcome you to Tiolive Support. It explains you how to ask us any questions you have (Learn how to contact support)
- The second one will provide you a link to your TioLive Instance's configuration wizard and a configuration key. Those informations will be needed by you to perform the configuration
The configuration procedure goes as follows:
- Configuration Key
- Your Organisation
- Number of user accounts
- User accounts configuration
- Accounting
- Accounting preferences
- Summary
- Configuration process
Configuration Key:

On the first step, you have to choose the language of the configuration Wizard and to copy and paste the Configuration Key that has been given in the email. When it is done you can click on 'start'
Your Organisation:
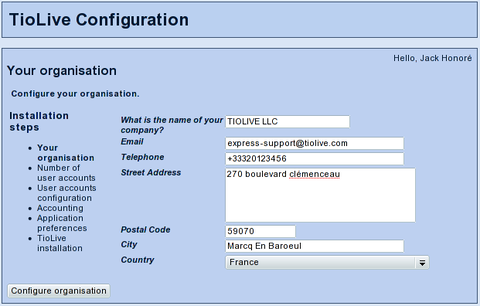
You will then have to fill all the informations about your Company. It is important for you to enter the correct informations as it wont be possible after the configuration to change them by yourself. Once it is done, just click on 'Configure organisation'
Number of user accounts:
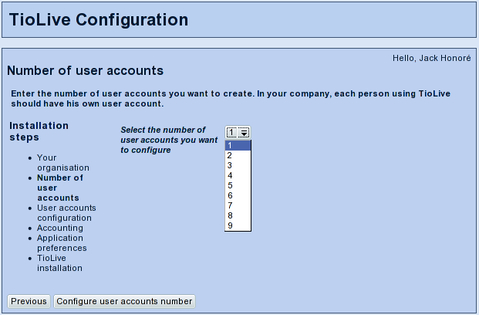
You will then have to choose how many user accounts you want to create during the configuration. You will be able to create as many users as you want even after the configuration. So you don't have to configure all the person of your organisation that will use TioLive now. Click on 'Configure user accounts number'
User accounts configuration:
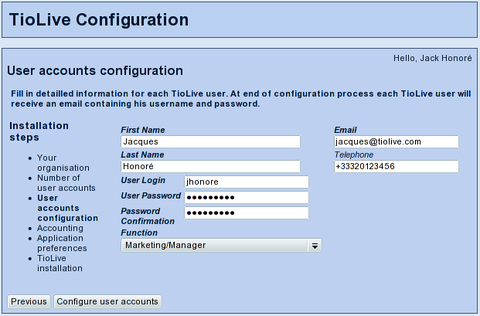
You will then have to fill in all the informations for as many user as you selected before. Please notice that they will receive their login and password by email so be carefull to enter the right email address. When it is done you can click on 'Configure user accounts'
Accounting:
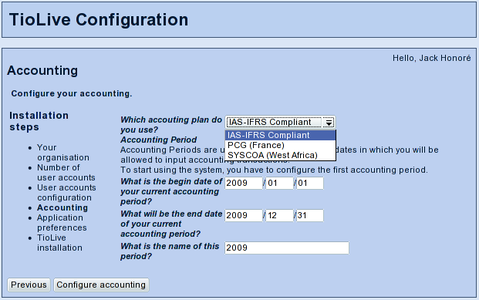
You will then have to choose the accounting plan you want to use (If the accounting plan that you want to use is not available, we can teach you how to make your accounting plan available in TioLive). Then you have to enter the accounting period beginning date, the ending date and the name of the accounting period. When it is done you can click on 'Configure accounting'
Accounting preferences:
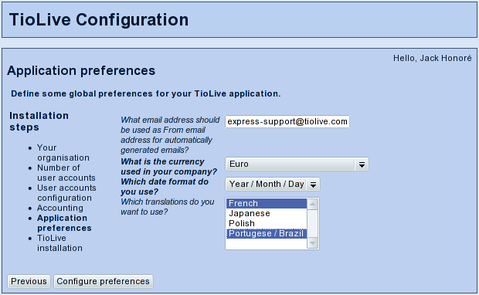
You will then have to choose the "from" email address of your account. This email address will be used for automatically generated emails. You have to select the default accounting currency and the languages that you want to be available in your instance. English will always be available, other languages have to be installed during the configuration process. When it is done you can click on 'Configure preferences'
Summary:
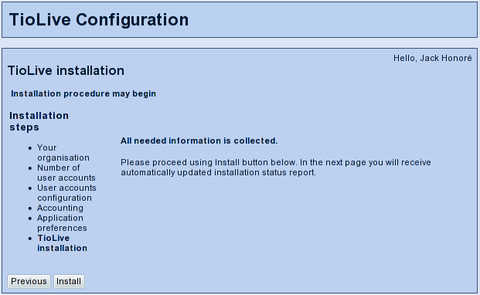
This step is to say that we have all the informations needed for the installation. It is still possible to go back and correct wrong informations, but once you will have clicked on 'Install' it wont be possible anymore. When you are sure of the informations you filled, you can click on 'Install'
Configuration process:
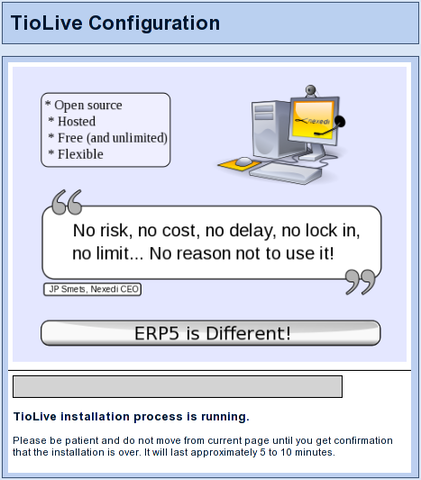
You can follow the installation progress thanks to the "installation progress bar". Even if you quit the page, you won't be able to stop the installation process. Once it is done you will see a link at the end of the progress bar that will invite you to login to your TioLive Instance. (learn how to login into TioLive)